Icebox cakes get a cool makeover for Mother’s Day
Published 12:00 am Wednesday, May 6, 2015
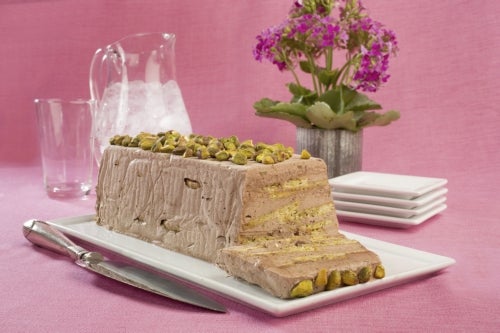
- Crisp homemade pistachio wafers form the buliding blocks of this icebox cake. More pistachios go into the chocolate whipped cream layered between the cookies. (Keri Wiginton/Chicago Tribune/TNS)
By Judy Hevrdejs
Tribune News Service
An icebox cake is totally old school. And totally perfect for Mother’s Day.
Why? Because when you were a kid, maybe Mom or Grandma helped you arrange vanilla wafers, banana slices and pudding in a pan, slathering it with whipped cream before chilling it. Then you devoured every last sweet bit.
And because it’s a dessert enjoying a renaissance, judging by the uptick in cookbooks on the subject in the past few years, including the latest: “Icebox Cakes: Recipes for the Coolest Cakes in Town.”
Jessie Sheehan co-wrote the book with Jean Sagendorph and suggests the dessert’s popularity is linked to our appetite for homey, comfort foods: “It’s in the same school as the cupcake phase and the whoopie pie phase.”
Of course, an icebox cake doesn’t use cake. Instead pudding and whipped cream soften crisp cookies to a cakelike texture. And while the “icebox” became a refrigerator a long time ago, the name has stuck to this dessert with a sweet pedigree; its ancestors include French chef Marie-Antoine Careme’s custard-and-ladyfinger charlotte and England’s trifle.
Credit its creation to a culinary convergence early in the 20th century: refrigerators became common household appliances, foodmakers began packaging cookies (i.e. Nabisco’s Famous Chocolate Wafer) often with recipes on the package, it was simple to make and newspaper food columnists were developing recipes using what they called “boughten” cookies. As one 1932 story noted, those cookies on their own are “really not half so exciting as serving them as shivery icebox cakes.”
By the 1950s, write Sheehan and Sagendorph, the icebox cake “was the darling of the dessert table.”
Their book goes beyond boughten cookies with recipes for made-from-scratch wafers, graham crackers and ladyfingers layered with puddings, whipped cream or both. And it takes the cake into the 21st century with 25 intriguing recipes, including red velvet, Mexican chocolate spice, chai-ginger, black pepper-rum and lavender-blueberry.
“If you do (an icebox cake) all homemade, it has more texture,” says Sheehan, a baker and recipe developer. “They’re so flavorful because the whipped cream is flavorful and the cookie component is flavorful.
“But I totally get it that people don’t have time,” she adds. So the authors suggest choosing a store-bought cookie or ladyfinger with some features of the homemade ones:
Cookies should be thin, dry and crispy (i.e. Nabisco Famous Chocolate Wafers, vanilla wafers, graham crackers, Anna’s Thins). Shortbread and fruit bars are too thick.
Use spongey, not crispy, ladyfingers.
Cakes with store-bought cookies will be ready to eat after 5-to-8 hours of chilling; homemade cookies need a 24-hour chill.
And the fun part? Creating this sweet treat with the kids for mom.
Tips
From Jessie Sheehan:
“When you’re cooking the pudding, don’t get distracted.” You could easily scorch it.
“Don’t automatically assume that because some extract is good a lot is better.” Taste as you go.
Whip whipping or heavy cream until it holds stiff peaks upright. “You want it to be firm, not chunky,” says Sheehan. “Go a little bit past what you might think would look beautiful in a dollop on a piece of cake. It needs to be firm to hold the cookies together.”
Use fresh soft fruits (strawberries, raspberries, blackberries, bananas). Avoid pears, apples, citrus, etc. “That might be yummy, but you’re eating it with a fork and knife.” Avoid frozen fruit; it will have too much moisture.
Strawberry-lemon icebox cake
Prep: 30 minutes
Chill: 24 hours
Makes: 9 to 12 servings
Adapted from “Icebox Cakes,” which includes a recipe for ladyfingers. We used store-bought ladyfingers.
• 1 cup granulated sugar
• 1/4 cup cornstarch
• 3/4 teaspoon salt
• 2 1/2 cups whole milk
• 3/4 cup whipping cream
• 1/3 cup fresh lemon juice and 3 tablespoons finely grated lemon zest (from about 3 lemons)
• 1 egg, lightly beaten
• 1 tablespoon unsalted butter
• 1/4 teaspoon lemon extract
• 24 ladyfingers, or more as needed
• 3 cups fresh strawberries, hulled, thinly sliced
• Lemon whipped cream, see recipe
1. For the pudding, combine granulated sugar, cornstarch and salt in a medium saucepan. Whisk in milk, cream, lemon juice and zest until combined. Add egg; whisk again. Place saucepan over medium-high heat. Cook, whisking constantly. When the mixture begins to thicken and bubbles begin popping on the surface, turn heat to medium and whisk vigorously, 45 seconds. Remove pan from heat.
2. Strain pudding through a medium-mesh wire sieve into a heatproof bowl. Add butter and lemon extract; whisk until they are incorporated. You should have about 5 cups. Let the pudding cool slightly; it should still be warm and relatively pourable when you layer it with the ladyfingers. Prepare lemon whipped cream.
3. To assemble cake, spread a generous layer of pudding on the bottom of an 8-by-8-by-2-inch baking pan. Cover as much of the pudding as possible with a layer of ladyfingers, filling any gaps with broken ladyfingers. The pieces should touch. The goal is a solid layer of ladyfingers.
4. Set aside about 1/4 cup sliced strawberries for garnish. Layer some remaining strawberries over the ladyfingers. Continue layering in this order (pudding, ladyfingers, strawberries) until you run out or reach the top of the pan, no matter what layer you end on. Spread the top of the cake with whipped cream. Gently cover with plastic wrap. Refrigerate 24 hours. Remove plastic wrap from cake; scatter reserved strawberries on top. Serve directly from pan.
Nutrition information per serving (for 12 servings): 295 calories, 14 g fat, 8 g saturated fat, 99 mg cholesterol, 38 g carbohydrates, 5 g protein, 212 mg sodium, 1 g fiber
Note: The dessert also can be made in 8-by-4-inch loaf pans; you will have enough pudding and strawberries for two. If you want to remove the cake from the pan for serving, line it with plastic wrap before building the layers.
Lemon whipped cream
Pour 1 1/2 cups whipping cream into a chilled metal bowl; beat on medium with electric beater or in a stand mixer until thickened. Add 3 tablespoons confectioners’ sugar; 1 1/2 tablespoons each fresh lemon juice, finely grated lemon zest and limoncello (an Italian lemon liqueur, optional); and 1/2 teaspoon lemon extract, or to taste. On medium-high, whip cream until it holds stiff peaks that stand upright when the whisk is raised. Makes: about 3 cups
• • •
Pistachio-chocolate icebox cake
Prep: 2 hours
Chill: 24 hours
Makes: 12 to 15 servings
Of the three elements in this recipe adapted from “Icebox Cakes,” make the pistachio paste and wafers first. Then 24 hours before serving, whip the cream and assemble the cake. If you want to sub a store-bought cookie, author Jessie Sheehan suggests a thin, crisp cookie such as Jules Destrooper Almond Thins.
• 2 1/4 cups flour
• 1/2 teaspoon salt
• 1 cup sugar
• 3/4 cup unsalted butter, at room temperature
• 1 1/2 teaspoons vanilla
• 1 teaspoon almond extract, or to taste
• 2 tablespoons whole milk
• 1 tablespoon light corn syrup
• 1 cup pistachio paste, see recipe
• 1/2 cup coarsely chopped toasted pistachios
• Pistachio-chocolate whipped cream, see recipe
1. For the wafers, whisk together flour and salt in a medium bowl. In the bowl of a stand mixer fitted with the paddle attachment, cream sugar, butter and vanilla and almond extracts on medium-low speed until slightly fluffy, about 2 minutes. Do not overbeat. (You can also mix with electric beater or by hand.) Scrape sides of the bowl with a rubber spatula.
2. In a small bowl, whisk milk and corn syrup to combine. Add milk mixture to the butter-sugar mixture with mixer on medium-low speed; beat until just combined. Scrape sides of the bowl with a rubber spatula. Add pistachio paste; beat just until incorporated. Add flour mixture all at once. On low speed, beat until dough just begins to pull away from the bottom of the bowl and forms a cohesive mass. Scrape sides of the bowl to fully incorporate all ingredients.
3. Divide dough in half; place each half on a sheet of plastic wrap. Loosely wrap dough, forming each half into a log about 2 inches wide. Roll logs along the counter, still wrapped in plastic wrap, to shape into cylinders. Tighten plastic wrap around logs; freeze at least 2 hours or overnight. If dough is too soft to shape into logs, form into a disk (or loose log shape), wrap in plastic wrap, then freeze about 20 minutes or just until cold enough to shape into logs.
4. To bake, unwrap one log; cut into thin (about 1/8-inch) slices, rotating log as you cut to keep it from flattening. Place slices about 1-inch apart on a parchment-lined baking sheet; freeze at least 10 minutes. Repeat with second log. If you need more room for slices, arrange on additional sheets of parchment paper, then layer dough-covered papers on top of each other on a baking sheet in the freezer, switching them out as you bake each batch.
5. Position a rack in the center of the oven; heat to 350 degrees. Bake one baking sheet of frozen rounds until edges begin to brown, 10-12 minutes, rotating sheet halfway through baking. Using a stiff metal or plastic spatula, immediately press down lightly on each cookie to flatten it. Let wafers cool on the baking sheet, 2-3 minutes. Transfer to a wire rack to cool completely. Wafers should be very crispy when cooled. If not, return to the 350 degree oven 1 to 2 minutes longer. Repeat baking additional sheets of dough rounds.
6. While wafers cool, toast 1/2 cup shelled pistachios on a baking sheet in a 350 degree oven until they begin to brown and become fragrant, 10-15 minutes. Stir nuts midway through baking to ensure even toasting.
7. Store cooled wafers immediately in an airtight container. They will remain crispy at room temperature, tightly sealed, for about 24 hours. Freeze baked wafers in a resealable plastic bag up to 1 month; you need not defrost wafers before assembling cake. Makes about 60 wafers.
8. To assemble cake, line a 9-by-5-by-3-inch loaf pan with plastic wrap hanging slightly over sides. Spread a generous layer of pistachio-chocolate whipped cream on the bottom of the lined pan. Cover as much of the cream as possible with a layer of wafers; fill gaps with broken wafers. The goal is a solid layer of wafers. Continue layering whipped cream and wafers until you run out or reach the top of the pan, ending with whipped cream. Gently cover cake with plastic wrap. Refrigerate, 24 hours.
9. Peel plastic wrap from top of cake. Place a serving platter over the cake and invert cake onto the platter. Carefully remove pan and plastic-wrap; sprinkle cake with coarsely chopped toasted pistachios. Slice and serve.
Nutrition information per serving (for 15 servings): 440 calories, 34 g fat, 16 g saturated fat, 82 mg cholesterol, 32 g carbohydrates, 7 g protein, 79 mg sodium, 3 g fiber
Pistachio-chocolate whipped cream
Makes: About 6 cups
• 3 cups whipping cream
• 1/2 cup pistachio paste, see recipe
•1/3 cup each: confectioners’ sugar, Dutch-process cocoa powder
• 1/4 teaspoon almond extract, or to taste
• 1/8 teaspoon salt
Pour cream into a chilled metal bowl; whip on medium speed until just thickened. Add pistachio paste, confectioners’ sugar, cocoa powder, almond extract and salt; whip on medium-high speed until cream holds stiff peaks that stand upright when whisk is raised; the stiffer the cream, the more support it will give wafers in your cake. Use immediately.
Pistachio paste
Combine 2 cups shelled unsalted pistachios and 1/2 cup granulated sugar in a food processor; pulse until nuts are finely chopped, about 90 seconds. Do not overprocess, or nuts will get too buttery. Transfer processed pistachios to bowl of a stand mixer fitted with paddle attachment. Add 1/4 cup water and 2 tablespoons room-temperature butter; beat on medium speed just until a thick paste forms. (Alternatively, beat with electric beaters.) Paste will keep tightly covered in the refrigerator for up to 2 weeks. Makes: about 1 1/2 cups
About Post Lifestyles
Visit us on Facebook: https://www.facebook.com/SalPostLifestyle/ and Twitter @postlifestlyes for more content
 More by Post